We are no longer building saddle trees, but we have two videos about how Western saddles fit horses available on our westernsaddlefit.com website.
Factors That Affect Tree Fit
Introduction
When the rider is in contact with the saddle, what he feels is primarily the result of the work of the saddle maker. What the horse feels is primarily the result of the work of the tree maker. So getting the correct fit is the job of the tree maker, based on the information given by the saddle maker and the customer. There is absolutely no standardization as to what quarter horse, full quarter horse, semi-quarter horse, or any other term means as far as fit goes. Even using numbers and measurements doesn’t mean the trees from different makers will fit the same (See Bar Angles: Why the Numbers Are Meaningless Between Makers) and there are many shapes that can’t be described numerically. So the only real way to compare trees among makers is to try them on horses and see how they fit. However, the same factors affect the fit regardless of who built the tree, and understanding these factors to the point of being able to evaluate them is what is important in assessing fit. This information article aims to explain what these factors are and how they affect the horse. While the factors that affect fit apply to all trees, the specifics given in this article apply only to our trees.
The Rider’s Responsibility
The basic and first principle of saddle fit is to “Position the Saddle” in the place it was built to fit. (Please see: The Proper Position of a Western Saddle.) This is the responsibility of the rider, and neither the saddle or tree maker can influence where the rider decides to place it. The traditional Western tree is built to fit right behind the shoulder blade and shaped so that as the horse’s leg is moved forward, the back corner of the shoulder blade will slip under the rounded front edge of the bar. By the time the horse puts weight on that leg again, it is back out from under the bar tip. This means the front of the skirts (generally less than 2” past the bar) will be over the shoulder blade, but if they are properly blocked (shaped to follow the curve of the bar), they will not affect the horse’s movement. The idea that you need to place the tree a couple inches behind the shoulder blade to avoid hitting it is false because the bars are shaped to account for that. However, even if it is improperly placed, the saddle will very quickly move to where it belongs unless 1) it really doesn’t fit the horse at all, or 2) it is held out of place by a breast collar, crupper, etc. or 3) it is placed so far ahead on the horse there is no reason for it to move back into place. Placing the saddle too far forward so that it rests on the shoulder blades and then holding it there with a breast collar will negate all the work the saddle and tree maker put into making a saddle that fits the shape of the horse’s back and is one of the, if not the, biggest cause of saddle fit damage to horses.
Two Principles
Theoretically, with an ideal fit the whole underside of the bar should contact the horse’s back at all times with an even pressure. In practice, this is impossible, since we are dealing with a rigid system on a flexible, mobile back. (The idea of flexible bars, while sounding good, has its own set of problems.) We know that the shape of the horse’s back changes not only with weight, use and time, but also with every movement he makes.
So there are basically two rules for well designed trees:
Principle Number One – “No Poking”. In other words, don’t dig in anywhere.
Principle Number Two – “Distribute the Pressure”. Have as much surface area as possible on the horse without breaking Rule Number One.
There is a fair amount of leeway within Principle Number Two, but you can’t break Principle Number One without consequences for the horse. To follow these principles, the shape of the bars must match the shape and size of the horse with enough edge relief that there are no pressure points. When this is correct, the pressure under the saddle will change its area of distribution on the back throughout each stride the horse takes, but it is always disseminated over a wide enough surface area that the pressure in any one spot is low. This is why a well designed tree will fit a range of horses. While it will use more or less of the surface area available (the middle of the range using the greatest amount of surface area), with well designed edge relief it won’t break Principle Number One until it is put on a horse with a very different body type than what it was made to fit. How much of the available surface area needs to be in contact to avoid problems depends on weight of rider, duration of ride, roping use, how well the rider rides, etc.
Fitting a Body Type
 |
 |
 |
When we build a tree, we build for a type of horse. Even for owners with a single horse they are trying to fit, we work to determine the body type of their horse, and then fit that type, not that horse. Is this saddle going to be used on narrow thoroughbred types, halter class quarter horse types, horses that are in working shape or horses that are primarily pasture ornaments? If people ride both narrow thoroughbreds and barrel shaped quarter horses, they won’t be able to fit that diversity of types well with one saddle. Most people, however, have variations within one general body type of horse, and so we build to fit the most common type they ride, knowing there is leeway built in for a range around that ideal fit.
 |
 |
 |
Factors that Affect Fit
The areas to consider when fitting a tree to a horse are:
A) total surface area, defined by
1) bar depth/overall shape
2) total bar length
B) bar spread (distance between the bars defined by hand hole width)
C) bar angle (relative to each other)
D) rock (the amount of curve front to back)
E) twist (the change in angle from front to back)
F) crown (the amount of curve or roundness side to side on the bottom of the bar)
G) amount of gullet clearance (hand hole height, gullet height, cantle gullet height)
H) edge relief, especially relief at the bar tips
A) Total bar surface area
 The more surface area the rider’s weight is spread over, the lower the pressure per square inch, so a larger bar which doesn’t dig in anywhere and impede the horse is always better than a smaller bar if they are carrying the same weight.
1.) Bar depth/overall shape
 We have two outline patterns we use for our bars - a Regular and a Wade. The original Wade bar was designed to be in all day working saddles, so they have a bit more surface area than Regular bars, and they have a longer front bar tip to accommodate the extra stock thickness on a Wade fork. Our Wade pattern is about ¼” deeper (wider side to side) than the regular pattern except in the center of the bar where the rider’s leg goes, which we keep as consistent as possible in the finished tree. If the bars are set at the correct angle and width for the horse, the Wade bars will go down the horse’s side ¼” further than the regular bars and will fit the same. For us, this and bar tip length (see section H on edge relief below) are the only differences between Wade and Regular bars. The idea of a Wade saddle, tree or bar fitting in a specific way is a fallacy since all the other factors affecting fit are adjusted similarly regardless whether we use the Wade or Regular outline. We use the Wade bars for forks with a stock thickness of 4 ½” or more and Regular bars for forks with a stock thickness of less than 4 ½” unless requested otherwise.
2.) Total bar length
 |
 |
We measure this bar tip to bar tip, across the curve. Others measure it measure flat on a table. We find about 3/8" to ½” difference in the measurement based on the method used. How long the bar will be on a particular tree depends primarily on the rider’s size, but the horse also needs to be considered. If the bars are too short, they may not have enough surface area to sufficiently spread the weight that is put on them. If they are too long, they may interfere with the horse’s movement or position the rider too far back. The idea that that the saddle should not extend past the last rib has no basis in anatomic fact and while design wise it may or may not apply to English saddles where there is very little behind the rider, it does not apply to Western saddle design where the rider is inches ahead of the back of the bar, let alone the back of the saddle. There is no problem with the back bar tip extending onto the lumbar area of the horse provided it 1) has the correct amount of rock and 2) does not dig in at the back bar tip. We do not have a standard bar length. Rather, we have 6” of bar behind the cantle cut on the bar, and 5” (Regular bars) or 5 ½” (Wade bars) in front of the fork cut on the bar. The distance between the cuts changes with the seat length and all its variables (See Seat Length and Thigh Length Relationships). However, we have set a minimum and a maximum bar length. Minimum for a regular bar is generally 22” unless it is for a kid’s saddle or super short horses. Maximum is 24 ¼”. Measurements for Wade bars are ½” longer due to the longer bar tip. For seat lengths that would make bars longer than the maximum, there are various options to change angles, etc. and still leave adequate bar length behind the rider. When all else fails, we move the cantle back on the bars so there is less of bar behind it. If a customer rides Arabs, youngsters, or other shorter backed horses a measurement taken from the back of the shoulder blade to the point of the hip is a good way to compare usable back length and helps us determine if longer bars might be a problem or not.
B.) Bar spread (distance between the bars defined by hand hole width)
 Although gullet width is commonly used here, hand hole width is a much more consistent way to set bar spread. (See Why We Use Hand Hole Width Instead of Gullet Width for the explanation.) We use four basic hand hole widths that will cover almost all horses. The 3 ¾” measurement fits narrower horses - either narrowly built or just small bodied horses. This includes most thoroughbreds and thoroughbred crosses as well as some smaller breeds. While this used to be a very common size, we are not making a lot of trees at this width any more. The 4” and 4 ¼” measurements are the most common sizes now though we still make a few more 4”. The 4” measurement fits horses that are not real wide and that don’t have heavy musculature behind the shoulders. It is a common measurement used on a lot of in shape ranch horses in the north west US and Canada. The 4 ¼” measurement is used for broader backed horses that need the extra width, more common in ranch horses farther south and east. For really large or wide backed horses and some with very heavy muscles behind the shoulder blades, we use a 4 ½” hand hole measurement. We measure the hand holes in the wood. In the rawhide, they would measure almost ¼” narrower. (The rest of our measurements, with the exception of stock thickness, are in the rawhide.) Note that we set the width between the bars at the cantle to be ½ inch less than the hand hole width on our trees.
The ideal is for the bars to have contact with the horse over as much surface area as possible. A tree that is too narrow contacts the horse only on the lowest part of the bar, with lots of air space under the top edge of the bar. It will also sit higher than a better fitting tree. A tree that is too wide will sit lower, especially at the front. It will therefore tend to tip forward, making wither contact more likely and lifting the back of the bars off the horse. There is usually one width that is ideal for each horse. However, with the correct angle and shape to the bottom of the bars, a tree that is slightly narrow will just sit a bit higher, and a tree that is a bit wide will sit slightly lower, but neither should dig into the horse and cause problems.
C.) Bar angle (relative to each other)
 When a tree is made, the bar angle is set by the angles used on the fork and the cantle. While different makers may use the same angle marked out on the fork, other angles used in cutting out the fork as well as differences in shaping of the bottom of the bars mean that one maker’s 90 degree tree probably will not fit the same as another maker’s 90 degree tree. (See Bar Angles, Why the Numbers Are Meaningless Between Makers for the explanation.) Saddle makers need to be aware of this fact if they use different tree makers and check out the differences in fit so they understand what fit they are getting with each maker’s specs.
The most common angles we use are 90 degree and 93 degree. The 90 degree works best for a horse that is not overly muscular behind the shoulders and is in good working shape. The 93 degree is more forgiving of the extra pounds a horse may be carrying. It might also be a good compromise for someone who rides a range of horse types. For the broader withered, flatter backed, or more mutton withered horses, 95 degree has been fitting well. We have even gone wider where necessary.
The two and three degree difference between 90 and 93 or 93 and 95 doesn’t sound like much, and it actually only makes about 1/8” difference in the measurement across the bottom of the bars with the same hand hole width. It can even be hard to see any difference in fit on the middle of the road horses where either would work well. But you can see the difference on the wider horses where the bottom edge doesn’t push into the horse as much and the top contacts better with the wider angle. With a narrower horse, the bottom of the bar starts lifting off the horse if the angle is too wide, increasing the pressure on the upper, inside edge of the bar, particularly at the withers.
Angle and hand hole width need to work together to allow the bars to have full contact across their width, and the two measurements often correlate. Trees that have a 3 ¾” hand hole width would often have bars set at 90 degree. A 4” hand hole width tree would usually have 90 degree or 93 degree bars. A tree with a 4 ¼” hand hole width would often be made with 93 degree bars, since most of the larger horses needing that width also need the bars angled out bit, though some makers like it at 90 degree. A horse that needs 95 degree bars would typically need the 4 ¼” or even 4 ½” width. However, there can be exceptions to these generalizations.
D.) Rock
 Rock is the total curve of the bottom of the bar from front to back which matches the curve in the horse’s back underneath the bar. This is different than the topline since the height of the spines of the vertebrae (which varies between horses) determines the topline while the amount of rock is based on the combination of the relative position of the bodies of the vertebrae, the ribs and the muscles overlying them. How much curvature there is varies between horses depending on conformation, age, amount of musculature, etc. Withers that are very muscular and bulge out increase the rock needed at the front of the bar. Horses that have a rise towards the croup, like a lot of Quarter Horses do, will need more curve towards the back of the bar so the bars don’t dig into the loin. A horse with both muscular shoulders and a rise into the loin may need a lot of rock from a young age. As horses get older, their backs tend to sag more (this is often dependent on their condition) while young horses, especially those less than 5 years old, will tend to have flatter backs. Mules also tend to be very flat backed.
Rock is also the factor that varies the most with the horse’s movement, head position and stance. If the head is held low or in, the center of the back is raised, decreasing the amount of rock. If the head is held up or out, the center of the back drops relative to the withers and croup or, in other words, it has more rock in it. The back flexes and extends (rounds and hollows) with every step at every gait. There is also a commonly taught idea that a horse needs room to “round up” into the center of the bar so the tree should bridge slightly at rest. However this has never been demonstrated experimentally and in fact the opposite has been shown - that with dead weight, the horse’s back will sag. The same happens under a rider who asks for rounding. It is interesting that if you ask a number of tree makers “If you had to have a bit too much or a bit too little rock, which would you choose?” you would receive answers on both sides. (Our answer to the question would be “a little too much rock”.) While everyone agrees that you don’t want it to be way off, it seems that due to the amount of movement in the back, there is a fair amount of leeway with this factor – so long as you don’t break rule Number One – No Poking.
A tree with too little rock will “bridge” (not touch in the middle), increasing the pressure where it does contact on the front and the back of the bar. Although not as obvious as trouble at the shoulder, a back bar tip that digs into the loin will cause problems for the horse and affect the movement of the back legs particularly. A tree with excessive rock will, depending on rigging and rider position, put too much pressure on the front and/or center part of the bar and may also cause the saddle to tip forward.
There is no defined measurement for rock (though the Dennis Lane system has cards that describe the shape of different horses). We make our standard rock which we have found works well on the majority of working ranch horses we commonly build for. If you know your customer will be riding a lot of colts, or if you want a tree to fit mules, we will make the bars flatter. If they ride horses with a lot of rock in their back, let us know and we can increase it.
E) Twist

Twist, when referring to Western saddles, is the difference in angle from the front to the back of the bar. (Note that this is different than the definition used for English saddles where twist refers to the narrowest part of the seat.) While it is important to get the angle at the front to match the horse, it is equally important to match the angle all along the bar right to the back. This means there is a gradual change down the length of the bar. We generally use our standard twist which works well on the majority of horses we build for. If for some reason the withers are much narrower compared to the loin than normal, or the loin is very narrow compared to the withers than normal, this may need to be changed. Again, there is no way to measure or describe a specific amount of twist in the tree. If the angle between the bars is too narrow at any point, the bottom edge of the bars will dig in. If it is too wide, the inside edge will be in contact but the bottom edge will be lifting off.
F.) Crown
 Crown is the curvature or roundness side to side on the bottom of the bar. The amount of crown needed depends on the shape of the horse. The wither area has the most variation, from bulging out, to flat, to slightly concave, to really sunken in, but these same variations can be found all down the back. If the muscles really bulge out, then a flatter crown will have contact over a larger surface area and the edges will still not dig in. A totally flat back bar pad with edge relief will work well on very rounded loin muscles. A rounder crown on this type of horse will have a high central pressure either as a circle in the wither area (where the bar is rounded in all directions) or as a strip down the center of the bar further back. If the muscles make a flat surface on the horse, then some crown is needed to ensure the bar edges don’t dig in. Remember that with weight, the bar will press into the horse so what looks OK with just the tree may dig in when weighted. The wither pocket area is slightly concave on a lot of healthy backed horses, and too flat a bar there will leave the middle without contact, causing increased pressure on the edges of the bar. Severe hollows in the wither area or elsewhere down the back is often a sign of muscle atrophy or damage and should be properly evaluated and preferably corrected before trying to fit a saddle to the horse.
G.) Gullet clearance
 At no point should any part of the saddle put pressure on the tops of any of the spinous processes of the vertebrae. But so long as there is never any contact (at any pace, at any phase of the stride, even after hours in the saddle or when roping, anywhere down the spine) we follow the “a miss is as good as a mile” principle. The amount of room needed to clear the spine depends first of all on where the bars are sitting on the horse. If the tree is really wide and the bars sit low down the sides of the horse, then a higher gullet is needed to clear compared to having a narrower tree where the bars sit higher on the horse’s side. The first thing therefore is to decide on the correct bar width and angle to put the bars in the proper spot on the horse. Then the gullet height should be determined. Also remember that the gullet and hand hole height measurements are taken from a flat surface and are affected by the width (depth) of the bar itself. This makes it difficult to compare between makers. Our bar patterns are quite wide, so our hand hole heights will measure taller for the same clearance as makers with narrower bar patterns. What is really important is not the total height measured off the table, but the height of the arch on the fork itself compared to where it joins the bars. This measurement is what we change to make the different gullet heights, but it is difficult to measure exactly on a finished tree, let alone a finished saddle. (Please see Avoiding the Withers for more explanation.)
 |
 |
It is not only the height of the withers that needs to be considered, but also how far back that height goes. Some horses, such as the bay on the left, have tall withers that only start to rise well forward on their back. For these horses the gullet height, measured at the front lip of the fork, is most important. Others, such as the buckskin on the right, have withers that start to rise much farther back and for these horses the hand hole height, measured at the back of the fork, is more crucial. Along with this, the shape of the gullet (does it bulge down or is it scooped out well) is important. Because of the quality of wood and rawhide we use, we can keep the gullet itself quite thin to help with clearance under the middle of the fork. With our bar patterns, a hand hole height of 6 ¾” will clear almost anything if the bar width and angle are chosen correctly. 6 ¼” to 6 ½” are average heights, and 6 inches is generally a minimum hand hole height, though a really mutton withered horse will get away with less. Depending on the style of fork, 7” to 8 ¼” of gullet height are generally needed to clear most horses, though for slick forks with a narrow stock thickness, a gullet height of 8 ½” or even higher may be needed to get the hand hole clearance required. (Please see Avoiding the Withers for further discussion.)
 |
 |
While clearance at the withers is crucial, so is clearance all the way down the back under the groundseat and at the cantle gullet. This is not a problem on horses whose muscles bulge higher than the spine, such as the horse on the left, but needs to be considered for horses that have their muscles sloping away from the spine at the top, such as the horse on the right. Groundseat clearance is the concern of the saddle maker. The height of the cantle gullet is dependent on the tree maker. For really short cantles, we need to drop that height a bit from our normal to leave adequate wood for strength. Unless too wide a tree is used on a very narrow A shaped horse, the cantle gullet contacting the spine should not be a problem with our trees.
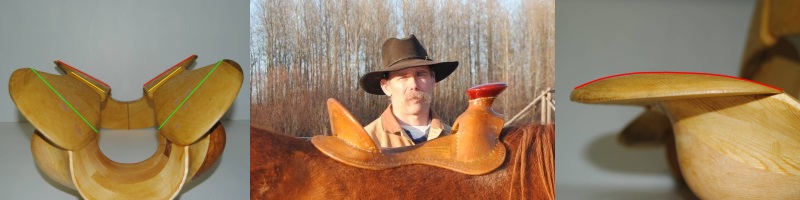
H.) Edge relief, especially at the bar tips
The edges of the bars can dig into a horse and cause pressure points, breaking Rule Number One. Getting the width, angle and shape of the bars correct means that the bar edges are not positioned to dig in but even then the shape of the edges determines what happens when weight is put on the tree. We curve the edges so there is a longer area over which the pressure changes rather than a sharp edge. This is what we term “relief”. This is important all the way around the bar – inside and outside edges – but especially at the front and back bar tips.
1.) Front bar tip
As the horse moves, the back corner of the shoulder blade (scapula) rotates down and back as he reaches forward with the leg compared to its position when standing. If the front bar tip is not built to allow this, the shoulder blade will bump into it with every step, causing a pressure point. To avoid this, the horse will short stride. There are a number of ways proposed to deal with this.
One theory is to place the saddle so the front of the bars are a minimum of two inches behind the scapula to allow its proper movement. While this may apply to English saddles with its points, which is where the theory originated, it does not apply to Western saddles. The bars are not shaped to fit that far back and the saddle will move forward. So this is out.
Another idea is to “flare” the bars out at the front so the bar tips may be over the back of the shoulder blades yet have no contact with them. The amount of the flare determines how far forward the bar tips extend over the shoulder blades. In this case, the saddle will move forward until the bar is over the shoulder blades, and when the horse puts weight on his leg, he compresses the muscle over the shoulder blade between the bar and the bone, which causes damage. This is why we don’t built our trees this way.
The solution we choose is to shape the bar so the front bar tip will sit behind the shoulder blade at rest, yet have the front bar tip rounded enough to allow the shoulder blade to easily slide under it. Having weight on the leg fixes the shoulder blade in place and it is at this phase of the stride that pressure from the bars on it could cause damage. The scapula is farthest back when the leg is extended forward with no weight on it, which allows freedom for the scapula to slip underneath the front bar tip. By the time there is weight on the leg, the scapula is again out from under the front bar tip. We make the bar tips on our trees shorter than many other makers’ trees in order to deal with the shoulder movement issue. For horses with a conformation more likely to have shoulder interference (very long, laid back shoulder blades, shoulder blades that bulge out from the body) we will also shorten the Wade bar tip to our regular bar tip length.
2.) Back bar tip
 The back bar tip digging into the muscles of the loin will cause just as severe problems as the front bar tip, but they are not recognized as often. It is not just the back muscles that are affected, but the origin of some major muscles of the hind leg. The result of excessive pressure here affects not just the back, which tends to stiffen and go more hollow, but also the movement of the hind legs, shortening the stride at least. Remembering that weight causes the tree to press into the horse more than an unweighted tree, we like to see the back bar tip lift off the horse for a ways with just a bare tree. If there is contact with a bare tree, it will dig in with weight. That is why we relieve the last 2” or so of the back bar tip a bit extra, even when the rock is correct.
Arizona Bars
 Arizona bars are mainly defined by their lack of a back stirrup groove. This picture shows the skirts and rawhide from a tree without a back stirrup groove. Notice the heavy wear from excess pressure where the stirrup leather sat, the total lack of wear behind it where there was no contact between bar and horse, and the return to wear as the contact resumed. The problem is that the back of the stirrup leather causes a lump where it goes over the bar, and creates a pressure point which can sore a horse. Some tree makers try to compensate for this by hollowing out the bar behind the stirrup leather, essentially making a long, gradual stirrup groove. This results in less surface area on the horse’s back, which is not good either. The original reason for the Arizona bar was to strengthen the most commonly broken place, the back of the stirrup groove, by having thicker wood there. With good quality wood and rawhide and a decent bar depth, strength should not be an issue. We have not had problems with breakage on our trees and they all have full stirrup grooves. The stirrup leather lump and/or the compromise on surface area preclude us from making this type of bar. It is one of the few things we will say no to making.
Conclusion
All of the factors discussed above are interrelated in how a tree works on a horse and all are important in the overall fit. Saddle fit is not like threading a nut onto a bolt where absolute precision is attainable. Absolute precision is not even desirable in saddle fit since the shape of the horse will change with every movement and what fits precisely right now may make for edges that dig in at another gait or at another phase of the stride. This is why the overall bar design (rock, twist, edge relief) takes into account movement while still getting maximum surface area on the horse. Wise evaluation of a tree on a horse comes from recognizing the various components of fit and knowing what is crucial (Principle Number One - no Poking) and what has more leeway (Principle Number Two - distribute the Pressure).