We are no longer building saddle trees, but we have two videos about how Western saddles fit horses available on our westernsaddlefit.com website.
A Tour of the Tree Shop
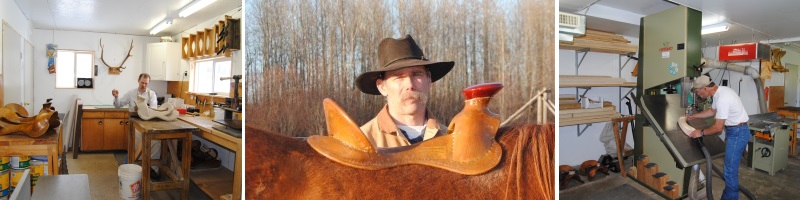
We put this page in for fun and so you can see where we spend our days, but also so you will understand why building trees, at least the way we do it, isn't something you can easily do in your basement in the winter.
 We built our shop in the spring of 1998 to be 30’ long by 16’ wide. In the summer of 2007, we added an additional 12’ in length to accommodate the new dust collection system.

Walking through the main door of the shop, ahead of you is the rough lumber storage on the back wall. Below the lumber is one of the drying areas for the trees. The trees are placed on the perfectly flat marble slabs and weighted to keep them square as they dry. We have a wood stove as our main heat source in the winter and a furnace as back up because we can’t let the things freeze. Behind the stove are storage shelves for horns, screws and nails and other supplies we use.

The center of the shop is dominated by the 8 1/2 foot high, 32” band saw. Although designed to saw logs into lumber, we need the height for the jigs we use to make the cuts on the bars for the fork and cantle to fit into. The table tilts so we can cut at different angles, and the wood blocks you see stored in front of the bottom door are used to keep all those angles consistent.

Beyond the band saw is the modified belt sander. The belts run up to stand idlers on the wall and are now completely enclosed, except for the wheels at the bottom where the shaping is done, to capture the dust. The 3” wheel on the right is used for gullets and horns and the 6” wheel is used for everything else. Hanging on the wall to the left of the sander are the jigs used to make those all important cuts in the bars. The white, 6” piping is for dust collection from all the machines.
 |
 |
In front of the sander is the 12” jointer/planer combination machine. It is used as a jointer when the table top is flat to smooth one side of the wood. Then the main tables are flipped open and it becomes a planer, with the blades on top and the wood sliding over the small table in the middle of the machine. This levels the other side and gets the wood an even thickness all the way across.
 Past the jointer planer is the varnishing table and beyond it are the doors to the “dirty room” and the cyclone room. Moving further around the addition, we have another work bench with more room for drying trees underneath. The jigs on this wall are used to set the correct cantle angle when cutting the glue surface of the cantle. This is also the area where Rod rawhides the trees.
 |
 |
The “dirty room” was built to confine the dust from the side grinder with the carbide grinding disc when Rod can’t work outside. The wood is clamped in the vice which is twisted and turned all directions as Rod carves away with his grinder. The table, besides being handy for holding tools as Rod works, also has a built in downdraft table to collect dust when rasping and hand sanding.
 The cyclone room contains our Clear Vue cyclone and filter set up. The system will move about 1400 cubit feet of air a minute, collecting the dust and chips where they are made and dropping the majority of them into the bin beneath the cyclone. The exhaust air is then either piped straight outside or re-circulated through the filters inside the box when it is too cold to heat replacement air fast enough.
 |
 |
The two glue presses are used for the final laminations after the different layers have first been glued edge to edge using the clamps or, where possible, pinch dogs. The wall behind the main glue press holds cantle and fork patterns. On the wall to the left hang some of the precision angles and T squares we have had specially made so we can mark the patterns on the wood very precisely. Beneath the table are assembled forks waiting to be used and pieces waiting for gluing.

Above the large workbench are more patterns and marking and measuring tools. The orders currently being worked on are hanging on the back of the bench while the parts for those orders that have been marked out or already cut out ready for shaping sit underneath.

Behind the door is the drill press used to make screw holes in the metal horns. The humidifier helps to keep the trees from drying too quickly in our relatively dry climate. Through the doorway is the rawhide room which includes a small furnace room just to the right. The large freezer you see just on the left holds the rawhide that isn’t used immediately.

The rest of the room is used to make rawhide when the weather is too cold to do it outside. The cement mixer stands in the far corner by the water and drain to tumble the hides. The 8’ by 4’ fleshing pole is brought inside on rawhide making days. The barrels hold hides in water while waiting for processing or soaking and rinsing afterwards.